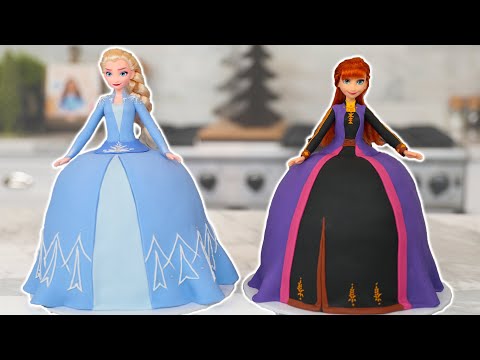
3 Sisters, 3 Cakes: The Frozen Twin’s Turn! 🎂❄️
3 Sisters, 3 Cakes: The Frozen Twin’s Turn! 🎂❄️ is a hard American recipe that serves 10. 350 calories per serving. Recipe by Messy Baker on YouTube.
Prep: 1 hr 30 min | Cook: 45 min | Total: 2 hrs 45 min
Cost: $42.86 total, $4.29 per serving
Ingredients
- 2 cups All-Purpose Flour (sifted)
- 1.5 cups Granulated Sugar (for cake batter)
- 1 cup Unsalted Butter (softened, cut into cubes)
- 4 large Eggs (room temperature)
- 1 cup Whole Milk (room temperature)
- 2 tsp Baking Powder (ensure fresh)
- 2 tsp Vanilla Extract (pure)
- 2 drops Blue Gel Food Coloring (gel for vibrant color)
- 4 cups Powdered Sugar (for buttercream)
- 0.25 cup Heavy Cream (chilled)
- 1 tsp Pearlescent Edible Glitter Dust (for crown shimmer)
- 0.5 cup Edible Pearls (various sizes)
- 1 lb White Fondant (rolled to 1/8" thickness)
- 0.5 lb Blue Fondant (colored with blue gel)
- 5 sheets Rice Paper Sheets (cut into shards)
Instructions
Make the Blue Vanilla Cake Batter
In a large mixing bowl whisk together the sifted flour, baking powder, and a pinch of salt. In another bowl beat the softened butter and granulated sugar until light and fluffy, then add the eggs one at a time, mixing well after each. Add the vanilla extract, blue gel food coloring, and milk, then gradually fold in the dry ingredients until just combined.
Time: PT20M
Bake the Cake Layers
Preheat the oven to 350°F (177°C). Grease two 6‑inch round cake pans, line with parchment paper, and divide the batter evenly. Bake for 25‑30 minutes, or until a toothpick inserted in the center comes out clean. Rotate pans halfway through baking for even color.
Time: PT30M
Temperature: 350°F
Cool the Cake Layers
Allow the cakes to cool in the pans for 10 minutes, then run a thin knife around the edges and invert onto a cooling rack. Let them cool completely before frosting.
Time: PT15M
Make Blue Buttercream Frosting
Beat the softened butter on medium speed until creamy. Gradually add powdered sugar, one cup at a time, mixing on low. Add heavy cream, vanilla, and a few drops of blue gel food coloring. Increase speed and beat for 2‑3 minutes until light and fluffy.
Time: PT15M
Level and Crumb Coat the Cake
Using a serrated knife, level the tops of both cake layers. Place the first layer on a cake board, spread a thin layer of buttercream over the top, place the second layer, and apply a thin “crumb coat” over the entire cake. Refrigerate for 15 minutes to set the crumb coat.
Time: PT10M
Apply Final Buttercream
Scoop a generous amount of buttercream and spread it evenly over the top and sides of the cake using an offset spatula. Smooth the surface with a bench scraper for a flawless finish.
Time: PT10M
Tint Cake Surface Light Blue (Optional)
Dilute a tiny amount of blue food coloring in a teaspoon of water. Lightly brush the mixture over the frosting to give an icy hue, then let dry for a few minutes.
Time: PT5M
Create Snowy Wintry Trees from Fondant
Roll the blue fondant to about 1/8" thickness on a lightly cornstarch‑dusted surface. Cut small leaf shapes (about 1" tall) and attach them to a short fondant stick, leaving a small handle for placement. Set aside.
Time: PT20M
Make Fondant Crown
Roll the white fondant to 1/8" thickness and cut a crown shape (approx. 4" wide). Brush the entire crown with pearlescent edible glitter dust. Attach small fondant balls (about 1/2" diameter) to the top edge, then gently press to secure.
Time: PT15M
Create Icy Shard Decorations from Rice Paper
Cut each rice paper sheet into irregular triangle shards (about 2‑3" long). Lightly brush each shard with a pinch of edible glitter dust and let dry on parchment for 5‑10 minutes.
Time: PT10M
Attach Decorations to Cake
Using the small fondant handles, press the snowy trees onto the sides of the cake at varying heights. Place the glittered fondant crown on the top center. Scatter the rice‑paper shards around the crown for an icy effect. Finally, press edible pearls of different sizes onto the frosting for sparkle.
Time: PT15M
Add Final Edible Pearls
Using tweezers, strategically place a few larger edible pearls on the crown and sprinkle the remaining pearls over the sides for a finishing touch.
Time: PT5M
Nutrition Facts
- Calories
- 350
- Protein
- 4 g
- Carbohydrates
- 45 g
- Fat
- 18 g
- Fiber
- 0.5 g
Dietary info: Vegetarian
Allergens: Wheat, Dairy, Eggs
Last updated: July 18, 2026