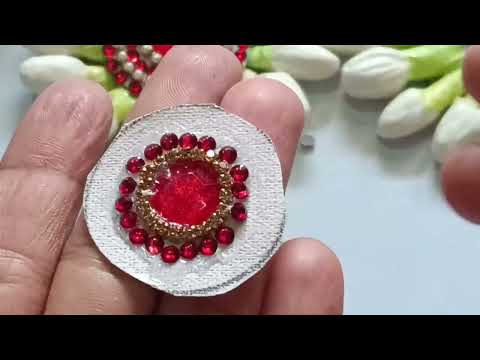
Handmade Floral Hair Accessory (Upin/Kundan Pin)
Handmade Floral Hair Accessory (Upin/Kundan Pin) is a intermediate N/A (Craft/DIY, not food) recipe that serves 1.
Prep: 2 hrs | Cook: 6 hrs | Total: 8 hrs 30 min
Cost: $22.10 total, $22.10 per serving
Ingredients
- 20-30 pieces Jasmine buds (real or artificial) (For floral decoration; can use pre-made artificial buds)
- 20-30 pieces Kundan stones (Flat-back stones, color of choice (red, maroon, pink, green, etc.))
- 1 strand Pearl chain or pearl beads (For outer decoration)
- as needed pieces Stone shine (decorative stones) or wall chine (For extra shine; optional)
- 1 piece Ready-made decorative pendant (optional) (For center decoration; can be handmade)
- 1 tube B7000 glue (Strong craft adhesive)
- 1 piece Canvas sheet or MDF board (Cut into a circular base, ~3.5 cm diameter)
- 1 piece U pin (hair pin) (For attaching to hair)
- as needed piece Thin metallic wire (golden color, optional) (For attaching pendant securely)
- a few sheets Tissue paper (To protect work surface)
Instructions
Prepare the Base
Cut a circular base (~3.5 cm diameter) from a canvas sheet or MDF board. If you don't have these, use thick cardboard. Adjust size as desired.
Time: PT10M
Arrange Jasmine Buds
Apply a thin layer of B7000 glue to one side of the base. Arrange jasmine buds side by side in a circle, leaving small gaps if desired. Press gently to adhere.
Time: PT20M
Let First Layer Dry
Allow the glued jasmine buds to dry for at least 4-5 hours (preferably overnight) for a strong bond.
Time: PT5H
Add Decorative Pendant (Optional)
If using a pendant, attach it to the center of the base using B7000 glue or thin metallic wire. For wire, thread through the base and twist tightly at the back.
Time: PT10M
Attach Kundan Stones
Apply glue in a circular pattern around the center (or pendant). Place kundan stones side by side, forming a neat ring. Press gently to secure.
Time: PT20M
Add Pearl Chain and Stone Shine
Apply glue to the outer edge. Attach pearl chain or beads, and add stone shine or decorative stones as desired. Press gently.
Time: PT15M
Final Adjustments
Check for gaps or unevenness. Add more buds, stones, or pearls to fill spaces. Adjust before glue fully dries.
Time: PT10M
Let Second Layer Dry
Allow the entire accessory to dry for at least 2-3 hours (preferably overnight) for all layers to set.
Time: PT3H
Attach Hair Pin
Apply glue to the back of the base. Attach the U pin (hair pin) firmly. Cover the back with a circular piece of canvas sheet for a neat finish. Let dry.
Time: PT15M
Final Drying and Clean Up
Allow the finished accessory to dry completely (at least 1 hour). Remove any tissue paper or glue residue. Clean up workspace and wash utensils.
Time: PT1H
Nutrition Facts
- 0
- Protein
- 0g
- Carbohydrates
- 0g
- Fat
- 0g
- Fiber
- 0g
Dietary info: low-carb, low-calorie, very-low-calorie, low-fat
Last updated: July 10, 2026